Showing posts with label crochet. Show all posts

Friday, June 26, 2026

Sewing and a Crochet Sling Bag

Last February, my sister bought a sewing machine for my mother. For several weeks, she worked tirelessly on her curtains, while I ordered some fabrics online to complete the quilt I had been working on since last year. One side of the quilt was from a damaged malong of my mother's, and I sewed the usable parts by hand.

machine and hand-sewn quilt project
I always sewed by hand. Growing up, I have been hesitant to touch the sewing machine ever since my mother recounted an incident when she was young: the needle broke, pierced her finger, and... yeah, I'd rather not continue. Suffice to say, it was not a story you tell people averse to needles.

This time, though, I was determined to learn. So when my mom was done with her project, I sat down and she taught me. It was initially really hard and needed more hand-eye-foot coordination than I thought. I can already imagine how difficult learning to drive a car would be.

But I eventually got the hang of it, and I am glad that (finally!) I now know how to use the sewing machine. I'm still on the straight-line phase, though.

I finished the quilt last April.

My sister modelling the crochet bag.

Then last month, I crocheted a sling bag using a local thick cotton thread brand. The pattern was from a Japanese book, and as always, when using different materials from what the pattern required, I ended up changing some things.

The final bag fits my phone, a small wallet or notebook, and maybe a couple of pens.

Thursday, November 26, 2020

Scrap Yarns and a Fair Isle-Inspired Crochet Beanie

Scrap Yarns - nephithyrion

It has been almost a year since I had a finished crochet project. The largest I've made was a grey granny square cardigan, which unfortunately came out short. Perhaps someone smaller than my size would be happy to have it.

Last year I had this urge to minimize my possessions, to focus on the essential things, and let go of unnecessary distractions. I didn't need a Marie Kondo to organize my life because I have always done what she was teaching. I was never a hoarder and kept everything simple. But I still felt the need to pare down a lot of things, including lists, projects, and online presence.

So I started with the easiest: books and craft supplies. I have been gradually donating my books and reducing my reading list to the ones I really want to read. No more pressure from peers and "books everyone should read" lists.

Fair Isle-inspired crochet beanie (nephithyrion)
Fair Isle-inspired crochet beanie

Next, I started to gather my leftover yarns and looked for projects that could use all those up. The first one was a Fair Isle-inspired crochet beanie. This took a long time to finish because I had no idea how to do it. It's not perfect, nevertheless looks pretty when worn by my sister.

I have another ongoing scrap crochet project, but it looks lousy; I don't know if I can save it. We'll see.

Stay safe, everyone!

Monday, August 26, 2019

Crochet Backlog

Some crochet works I haven't posted on this blog:

amigurumi panda - nephithyrion
Amigurumi Panda

crochet dumpling kitty - pattern by Sarah Sloyer - nephithyrion
Crochet Dumpling Kitty - pattern by Sarah Sloyer
crochet musical notes - nephithyrion
Crochet Musical Notes
Crochet red lace bookmark - nephithyrion
Crochet Lace Bookmark

Tuesday, October 16, 2018

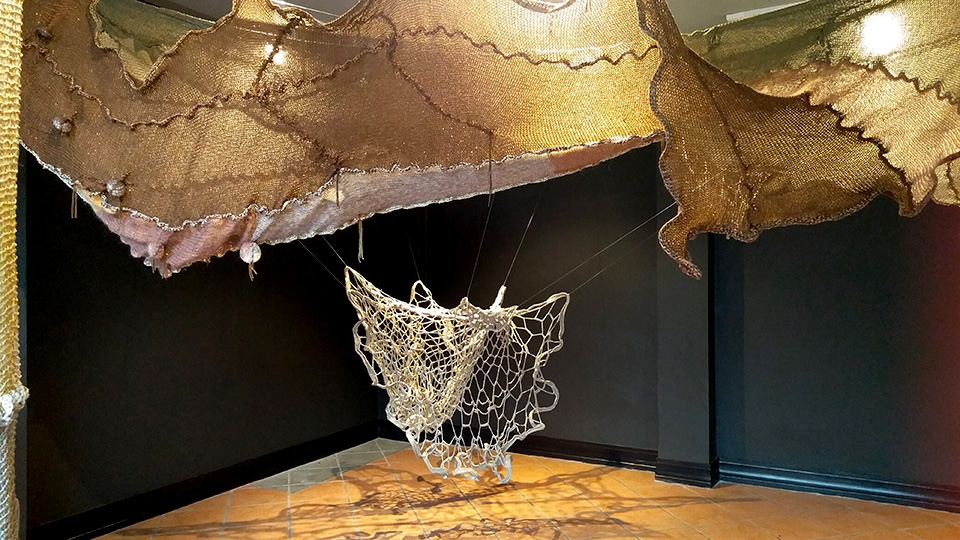
Aze Ong: I am living with monsters

Aze Ong: I Am Living With Monsters exhibition (photo: nephithyrion)
Aze Ong: I Am Living With Monsters exhibition
Two weeks of staying at home except for attending mass on Sundays, I've come out of hibernation to pay my quarterly tax and see two exhibits. Last Sunday, Padre Pio's heart arrived in Davao City for a four-day visit. From the airport, it was transported to ADDU Matina for the first mass and public veneration. In the evening, there was a procession to San Pedro Cathedral.

After lunch yesterday, I started for the church, but the line ended about 50 meters from the main gate. It was 1PM, the sun was scorching directly up and the line was not moving so I decided to come back later. At 3PM, the line reached farther down the street, although this time we were shaded by the buildings, dark clouds were covering the sun, there was a cool breeze, and the line was moving faster.

Lines at San Pedro Cathedral
Then I went straight to Aze Ong's thread art exhibit at Art Portal Gallery, where a friend of mine also works as a curator. I only intended to stay for 30 minutes, but I have not seen and talked to my friend for eight months, so... Then finally it poured after several days (maybe weeks) of false hopes. Yay!

For those who want to visit, the exhibit will run until November 10, 2018 at:
Art Portal Gallery for Contemporary Art,
Paseo de Legaspi, 115 P. Pelayo St., Davao City


This is a short description about the artist and the exhibit:
What kinds of monsters are you living with?
Manila-based visual and performance artist Aze Ong contends with monsters in homes and in the artworld in her upcoming exhibition I AM LIVING WITH MONSTERS in Davao's Art Portal, Gallery for Contemporary Art from October 12 – November 10, 2018.
Known for her installative crocheted works, Aze Ong uses fiber as medium in creating amorphous shapes to meditate on the discomfort of dwelling in limited spaces, the lack of privacy, and the chaotic soundscape of urban dwelling, as well as issue a proposition in an artworld that has long consigned the practice of crocheting and the use of fiber as feminized domestic labor.
The exhibition is curated by Laya Boquiren.
Aze Ong: I Am Living With Monsters exhibition (photo: nephithyrion)

Aze Ong: I Am Living With Monsters exhibition (photo: nephithyrion)

Aze Ong: I Am Living With Monsters exhibition (photo: nephithyrion)

Aze Ong: I Am Living With Monsters exhibition (photo: nephithyrion)

Aze Ong: I Am Living With Monsters exhibition (photo: nephithyrion)

Aze Ong: I Am Living With Monsters exhibition (photo: nephithyrion)

Aze Ong: I Am Living With Monsters exhibition (photo: nephithyrion)

Aze Ong: I Am Living With Monsters exhibition (photo: nephithyrion)

Monday, December 18, 2017

Crochet Christmas Ball Ornaments


Crochet Christmas Ball Ornaments
bottom left so rasta!

Made for a client, Dec. 2014.

Saturday, September 16, 2017

Crochet Crown

Late post. Crochet crown for baby Sophie's first birthday.

Crochet crown for babies

Crochet crown for babies

Based on this pattern by SashaPattern.

Monday, June 27, 2016

Crochet Smittens

crochet smittens mittens
mittens for couples
crochet smittens mittens

My gift for the newlyweds May & Jed, a special request by the bride, so they can HHWW abroad.

Wednesday, August 5, 2015

Back to Crochet

Yay!

I'm starting with things I've never done before, like amigurumi:

crochet bunny amigurumi photo by nephithyrion
Pattern by All About Ami

Little projects, like bookmarks/lace:

Big cross, little cross crochet bookmarks. Photo by nephithyrion
Big cross, little cross crochet bookmarks


Crochet lace bookmark - fan. Photo by nephithyrion
Crochet lace bookmark

and granny square coasters, which I needed:

Crochet granny square coasters. Photo by nephithyrion

I will need to take care of my hands better if I want more of these!

Friday, December 19, 2014

Crochet Watermelon Bikini Top

Crochet Watermelon Bikini Top

Not for me, but for my pretty petite neighbor. Fortunately, we were the same size so it was easier to make. This was modeled after this product from Urbanog.

I followed the pattern from the youtube video below and adjusted according to the thread that I used, which ended up having more stitches and rows. For this 32A size, I started with a chain which measured 2 inches, and from there proceeded with the rows.

Monday, September 1, 2014

Increasing a Shell and V-Stitch in a Crochet Hat Tutorial

When my aunt asked for a crocheted hat, she gave specific directions. She wanted something with holes that are not large and with just enough slouch. Immediately I looked for inspiration from books and the web. But the best one I could think of was the commonly used combination of Shell and V-Stitch. (Click the links for instructions on how to make the stitches.)

Those two stitches form just the right space in between and make good texture. It would be great for a hat and was easy enough in a linear/flat pattern, which unfortunately is not the case for hats. That was a problem and I couldn't find any pattern (or was lazy to search harder) to help me. So the best solution would be to work it out myself.

To cut the story short, it took me three hats to get it right. The hardest part was increasing the stitches while maintaining the spiral that the Shell makes. The photo below is of the first attempt. If you follow the spiral, it should reach the crown seamlessly. But for this one, the shell spiral was cut off near the top. Then there was also a small bulge, which I eventually covered with a pompom.

So how did I increase a Shell and V-Stitch combo for a hat? Directions for the pattern increase below:

Shell and V-Stitch Crochet Hat


Start with a magic ring.

Round 1: ch 3, 11 dc, sl st to 3rd ch (We consider the ch 3 as 1 dc. Total 12 stitches)

Round 2: We make a shell on the first st of round 1. So on the first st make ch 3 and 4 dc (this gives us 5 dc). Skip 1 st.
We make a V-stitch on the next st: dc, ch, and dc. Skip 1 st.
[Shell on next st. Skip 1 st. V-stitch on next st. Skip 1 st.] repeat twice.
Sl st to the beginning 3rd ch.
(Total: 3 pairs of shell and v-stitch. 24 sts)

We start increasing with round 3. I always increased first, and always on a shell stitch. To increase, we stitch one shell and one V-stitch to a previous shell stitch. What you need to remember is that we count the same way we increase, say, a flat dc circle. But instead of counting double crochets, we count the shell and v-stitch separately.

So from round 2, since there are 3 pairs of shell and v-stitch, we have a total of 6 "stitches." That means we increase by multiples of 3 (dividing 6 by 2 to get the total "stitches" of round 1).

Round 3 would therefore have 9 total shell and v-stitch. That is, a succession of 2-1-2-1-2-1 "stitches" in the third round, 2-1-1-2-1-1-2-1-1 in the fourth round and so on. The 2 here is the increase previously discussed. I hope you get the idea.

From this point on, the pattern in the image below will be referred to as "the Increase".


Round 3: sl st on to the 2nd st from the last row. We make the first increase (ch 3 and 4 dc on the current st (shell). Skip 1 st. V-stitch on the next st).
Then shell on the V-stitch from the previous round.
[Make the Increase. Then shell on the V-stitch from the previous round] twice.
Sl st to the beginning 3rd ch.
(Total 39 sts)

Note that the resulting 3rd round do not follow the shell-V-shell-V alternating pattern. In the 3rd round and for every other odd increasing round, there will be two shells side by side.

Round 4: sl st on to the 2nd st from the last row. We make the first increase (ch 3 and 4 dc on the current st (shell). Skip 1 st. V-stitch on the next st).
Then shell on the V-stitch from the previous round.
V-stitch on the 3rd st (center st) of the shell from the previous round.
[Make the Increase. Shell on the V-stitch from the previous round. V-stitch on the 3rd st of the shell from the previous round. ] twice.
Sl st to the beginning 3rd ch.
(Total 48 sts)

Round 5: sl st on to the 2nd st from the last row. We make the first increase (ch 3 and 4 dc on the current st (shell). Skip 1 st. V-stitch on the next st).
Then shell on the V-stitch from the previous round.
V-stitch on the 3rd st (center st) of the shell from the previous round.
Then shell on the V-stitch from the previous round.
[Make the Increase. Shell on the V-stitch from the previous round. V-stitch on the 3rd st of the shell from the previous round. Shell on the V-stitch from the previous round.] twice.
Sl st to the beginning 3rd ch.
(Total 63 sts)

Continue increasing for every round until you get your desired diameter (and on an EVEN Round). An even round means that you have alternating shell and v-stitches all around. So when you stop increasing, the alternating pattern will be maintained. A shell stitch goes on top of a v-stitch and vice versa.

Then proceed with the band, about 5-6 rows of single crochet would be enough.

Shell and V-Stitch Crochet Hat


P.S. This tutorial assumes the reader knows how to crochet a basic flat circle without a pattern. It was purposely made to be a guide so that in the succeeding rows, there would be no need to look back at the instructions. That way, custom sizes would also be easier to make.

If you found this tutorial useful and would like to give back, consider buying me a coffee:

Saturday, July 5, 2014

Crochet Owls and then some

crochet owl baby shoes and headband

I'm surrounded by a lot of babies! :)
This owl set is for Raine's second baby, who will be baptized this July.
For the owl on the headband, I followed Love the Blue Bird's pattern.

crochet owl baby shoes
crochet owl headband
crochet baby shoes and hats
crochet baby boy hat
crochet baby shoes

Thursday, March 20, 2014

For baby - Crochet

crochet cat hat brown

Crochet projects for friends.

Shoes look easy to make, but honestly, I'm still having a hard time with the openings, especially without some fittings. Free sole size charts are abundant (here and here) but how to finish so that slip-ons wouldn't slip off makes my head ache. It would be better to just add straps next time.

crochet tinkerbell baby shoes
something like Tinkerbell's shoes

crochet tinkerbell baby shoes

little birds will sing along in time,
leaves will bow down when you walk by
and morning bells will chime

~ John Denver (For Baby)


Saturday, January 25, 2014

Belated Crochet Hats

The illness made me put off making these gifts until the new year. Then they had to be finished before serious work started again. I often wished I had more than two hands because I'm a slow stitcher.

nephithyrion crochet hats

crown-stitched crochet slouch hat

Filet type crochet beret hat Filet type crochet beret hat
This is a revised and an all-crochet version of the pattern here

Treble cross stitch crochet slouch beret
Another revised pattern. Original here
I worked from crown to brim instead of the other way around.

black Diamond ridges crochet beanie
Diamond Ridges pattern
This is for a special friend. She wanted something black so I looked for a good texture.

black Diamond ridges crochet beanie

Tuesday, December 31, 2013

Free Crochet Pattern: Lace Beret

crochet beret nephithyrion

I've been receiving a lot of emails lately asking for the pattern of this beret (pictured right). This was originally posted here. And because this hat was a fluke while following a cloche hat pattern from a Japanese book, I had to make adjustments so as not to copy directly from the original pattern. That way everyone could make this hat.

You can purchase a printable PDF version of this pattern on Ko-fi.

MATERIALS
2 mm hook
Monaco Acrylic 3-ply yarn (3 skeins) - This is a local brand of the Philippines.

STITCHES
ch - chain
dc - double crochet
dc cl - double crochet cluster (instructions on how to do this) - This pattern uses 2 dc cl and 3 dc cl.
sc - single crochet
sl st - slip stitch

I will also be using the term string to mean a group of chain stitches.

STEPS
NOTE: This is a circular pattern. The image below shows the first four rounds in linear arrangement. Make a Magic Ring then proceed to round 1.

crochet pattern: lace beret

Round 1
ch 3 (counts as 1 dc), ch 1, [dc and ch 1] 11 times, sl st to the third beginning ch to complete the circle. (count: 12 dc)
Round 2 (please refer to image above)
ch 3, 2 dc cl, [ch 5, 3 dc cl] 11 times, ch 2 then dc to the beginning cluster. (count: 12 strings)
Round 3 (please refer to image above)
ch 3, 2 dc, [on next string 3 dc cl, ch 6, 3 dc cl] 11 times,  3 dc cl on next string, ch 2 then dc to the beginning cluster. (count: 12 strings)
Round  4
This is an increasing round. Following the image above, make 2 sc on every other next string. We start with 1 sc on the first string from row 3. Make 5 ch. Then sc, 5 ch, sc on the next string from row 3. Make 5 ch, then sc on the next string from row 3. Make 5 ch. Then sc, 5 ch, sc on the next string from row 3, and so on. Finish off with ch 2 and dc to the beginning sc. (count: 18 strings)
Round 5
Same as round 4 without increasing. Start with a sc, then 5 ch. Repeat this pattern and finish off with ch 2 then dc to the beginning sc. (count: 18 strings)
Round 6
This is an increasing round. Follow the same pattern as round 4, but this time, make 2 sc on every 3rd string. (count: 24 strings)
Rounds 7-9
Same as round 6 without increasing.  (count: 24 strings)
Round 10
This is an increasing round. Follow the same pattern as round 4, but this time, make 2 sc on every 4th string. (count: 30 strings)
Rounds 11-12
Same as round 10 without increasing.  (count: 30 strings)
Round 13
Follow the pattern of round 3, but this time with only 5 ch per string. (count: 30 strings)
Rounds 14-19
Same as round 10 without increasing.  (count: 30 strings)
Round 20
Same as round 13. (count: 30 strings)
Rounds 21-23
Same as round 10 without increasing.  (count: 30 strings)

For a slouchier hat, add more rounds. To make the band, start with 3 dc per string. That would be 90 dc all around. Decrease if necessary to fit head. For my hat, I had 3 rounds of dc for the band.


crochet pattern: lace beret measurements


Please report any errors.

NOTE: Please don't sell, distribute, or post this pattern as your own. If you are making a translation to another language, please link to this post. If you sell the finished product, a credit to the author would be greatly appreciated. Thank you!


If you found this pattern useful and would like to give back, consider buying me a coffee: